New Series of Structures from OwlMtModels Under Development

Owl Mountain Models is working on several fun projects which have been behind closed curtains until now.  The Owenyo structures which we need for the demo/photography layout will be made available in very limited production to meet reservations, which are open as of 2023-11-17.  No down-payment will be required, as we're still early in development of the CAD models.  Both HO and S-scale versions are planned to be offered.  Price is currently TBD until designs are finalized and we get quote from 3d printer.


Researching this structure has required many hours studying photos, aerial photos, and modern archaeological measurements.  We want to produce the best kits, balancing details and final finish looks.  This results in currently planning that the upper boards will be stain-able strip-wood, while the bents and lower structural members will be 3d printed with NBW details already in place.  Basic wood-effects should be pretty easily added to the 3d printed resin parts, like the finishing on our plastic lumber loads.


The full length of the trestle with NG approach from level grade over the SG Tell-Tales is over 7 feet long!  That's why we'll be offering the trestle as modular pieces, so that it can be fit onto smaller layouts.  The OwlMtModels photo-demo layout trestle will be shortened to only 4-GS gondolas for the dump section and most of the Approach Trestle will be truncated into the backdrop wall.

High-angle view of the dumping section of the trestle.

Jason's been working hard looking at all the photos he can to check for the details.  The CAD allows all the pieces to be worked out in 3d, resolving and solving questions about the prototype photos, which he's not seen solved in previously published drawings. Hopefully, this will be the best researched model of the Transfer Trestle yet produced.  Research is still continuing in 2023.

Water Tank


Rough CAD rendering 2023-11-17, subject to redesign and detailing

The water tank at Owenyo was moved from Diaz in 1952 according to the Employe Timetable station ans services list.  There's still much more to add to this CAD model, but it will make an amazing little tank for any small engine facility.  The footing should be about 2.5" diameter and estimating about 4" tall for HO scale.

Bulk Loader/Conveyor Shed


Partly drawn as of 2023-11-17 work-in-progress

Another structure which is researched from many photos and modern archaeological research of remains.  This structure will also make a great little loader for boxcars or covered hoppers on any small layout, for those not modeling Owenyo specifically.

Pump Houses


We have some research on the Water Pump House and photos, which should allow a model to be produced.  As of 2023-11-17, Jason hasn't started the drawings for this structure.  The Fuel Oil Pump House will also be made, but research is minimal at the current time, and the CAD model has not been started at this time.

Reservations Contact


Currently, two customers have expressed interest in kits for these parts.  Please show your support by contacting sales@OwlMtModels.com to submit reservation, specifications of what size and scale is desired.

Open Loads (Part 10) - Athearn 40ft Flat with OMM 3002 Lumber Load


Time to upgrade my old Athearn 40ft flatcar with a new 3002 OwlMtModels Lumber Load!

Many years ago I upgraded an Athearn 40ft flatcar and recently I wanted to put a nice lumber load on it from OwlMtModels' new "Short-Wide" series.  While some of my previous Open Load posts have covered more unique loads, this time I want to cover a more 'classic' load, but with it's own twists.

The Flat Car


Originally, the Athearn flatcar I used was one that had some holes in the deck to attach the plastic blocking for the cabin cruiser boat from Athearn.  The old load supports were simply removed from the car by un-snapping it.

New 'Old" Deck


When I upgraded the car with scratch-built deck from strip-wood sticks.  I also cut-down the plastic deck of the car, even with the steel sides.  The SP's 40ft 1949-built F-50-16, which this car was a stand-in for had overhanging deck boards, which were even with the outer edge of the stake pockets.  The deck was cut back around the stirrup and grab-irons around the car's end, so likewise my deck is notched back.

I also fitted the car many years ago with some scrap wood stakes and also glued a piece to the deck to represent some bit of left over dunnage and blocking nailed to the deck.  Thankfully, it's close to the brake wheel end of the car, so it stays out of the way of the upcoming load I will build for the car.  I can always pull out the two wooden stakes if I want to.

Repainting


The next step was to repaint and then decal the model, I believe I used either Floquil FCR or suitable acrylic paint, I honestly don't remember 25-odd years ago when I did it.  I think the decals I used were a mix of MicroScale 87-911 for the road number, and weight data. and probably the "SOUTHERN PACIFIC" in small font from the old MicroScale SPMW decal set.

Weathering


I weathered the car overall with a dark gray road-grime coat, including over the reporting marks.  I probably would have done more 'clerk wiping' of a rag over the road number to keep it more legible.  The car must have had several bad trips in a row to be this dirty in only 1-2 years given that I now claim to model 1949-1953, and the car was new in 1949!

SP 140195 stand-in Athearn car for SP F-50-16 class car, built in 1949, set up as idler car for over-length gondola load.

In this condition I had the car in service at LMRC for about 20 odd years.  The only real damage was the plastic Tichy brake wheel was broken when I brought the car home.  While it was not accurate for the SP's prototype 40ft F-50-16s, this car acts as a stand-in.  Note that I've posted an article on kitbashing a more accurate car from Red Caboose F-70-7 kit SP 140234 (Part 1) - Kitbash RC F-50-16 from F-70-7

The Lumber Load


The new OwlMtModels 3002 "Short-Wide" Modular Lumber Load kit is slightly shorter than the 3001 kit from 2015, are ideal to build a load for this car. 

I decided to do a 'messier' load than some of the ones I've built before.  That is a load which isn't exactly stacked cleanly on the length of the car.  Instead I want the upper units of lumber to have shifted and started to impacted into the adjacent stack, but not so much that the boards are damaged or the stakes being broken.

Other end showing.

This load can be shifted around in and out one stake pocket on this car to get more separation between the load.  When close-fitted on the car, the load has started to shift towards the far end, so the train crews should probably keep an eye on this car!

The random-end lumber loads

One of the fun parts of the OwlMtModels lumber load is the busy look of the 'random ends' of the lumber stacks.  This end-view also gives a good angle to see that on this load I left the lateral wooden bracing about 3-4" above the main part of the load.  The longitudinal board bracing was also done with some shorter fragments.  Either to simulate repairs or the original shipper not having enough of the length that they would have ideally had to match AAR standards.  There is photo evidence of some prototype cars being even more jury-rigged than this car!

I'm still working on making my loads with "wonky enough" bracing to match the photos I've seen.  So I've actually been sticking "to the book" more than some loads had.  Although, to be fair many single-car/load photos were actually to document something wrong, so maybe those photos were documenting the poorly braced loads.  So there's always room to critic your work and look for ways to make it more prototypical.

Wood-Color


The final color adjustments was made with Apple Barrel 21186E Golden Sunset, and then a wash of darker gray-brown. to make more accent to the board edges, etc.  

I did some wash on the lumber load to make it more orange.

I like this combination of coloring and accenting wash.  This load is also a fun one to swap around to change the look of it.  If a group of 2-3 loads are finished at the same time, then the stacks could be shuffled between cars, and not kept as a 'set' for a single car, which would obviously vastly increase the lumber of combinations that could be seen on consecutive load/empty cycles.

In Closing


This has been a good old reliable flatcar from 'old school' model railroading with classic tooling.  With a little bit of work, they can be brought up to fairly modern standards and the addition of the modern load brings it in-line with my other examples in my flatcar fleet.

Jason Hill

Related Articles:


SP 140234 (Part 1) - Kitbash RC F-50-16 from F-70-7 - Kitbashing a more accurate F-50-16 flatcar.

Open Loads (Part 8) - Modeling High-Tension Steel... - How to use Chart Tape for Steel Banding.

Open Loads (Part 7) - Shifted Lumber Loads - Modeling unique loads which have shifted in transit.

2023 November News Updates - A Month of Conventions & Shows


Shaking off the Covid-webs with a quick stop on the way to Bakersfield at Walong Siding. - a.k.a. Tehachapi Loop.

It was great to see everyone at Bridgetown RPM in Portland Oregon in early October and at the end of the month with the SPH&TS Convention in Bakersfield, California! Thanks to everyone for chatting and showing their support of OwlMtModel's new Decal offerings and the newly tooled Short-Wide Lumber Loads!

OwlMtModels table at the Bakersfield convention with a full table of products and models to look at and talk about!

The sales from the two October conventions allowed me to check out without the hotels breaking any knee caps or keeping me to wash dishes. It even allowed me to pay for the fuel to get home!

Piles of products to ship out... (Photo from Sept, 2017 F-50-series flatcar kits) - The orders for 3002/3003 lumber loads and decals has been almost this heavy!

The OwlMtModels crew is working all weekend to get the orders that came in during the second half of October ready to go.  Several items in the decal line are out of stock for a week or so, but we expect to have those back in-stock and shipped by mid-November.  Sorry for the delays.

Conversion Kits for Bachmann-Spectrum 2-8-0 to SP/Harriman C-class


Currently, we're waiting for the molds for the invests to be remade. This should be done during November, and hopefully test castings for the rods/yokes/crossheads/guides done before the end of the year.

Pilot Model for conversion parts.

Once we have those, we can go into production with the cylinder 3d printing and production run of white brass castings for the metal parts.

SP B-50-8/10/11/13/14 Series Conversion Kits & Supply Car Doors


Thanks for the continued interest in the conversion parts for the Accurail 4000-series kits to be converted into SP Boxcars.

Currently, I need to do some redesign to resolve 3d printing issue with the trial ends that we had made this summer. Now that I'm back from the SPHTS Convention and Bridgetown convention, I should be able to put some time into getting these conversions into production.

Thanks for everyone interested in these to put in their reservations now, so we can get a feel for how many sets we need to produce for the first batch.

New Products Coming


We have several new projects that are in the works as well in the background, which we've not announced. I'm sure all our SP modelers will enjoy our up coming projects.

We also have a new Lumber Loads, which we'll hopefully have ready by Early 2024, so remember to subscribe to this News Blog for updates on New Product Announcements! These shouldn't be so much of a surprise, as Jason's been talking about them at the in-person meets this year! So those folks attending were able to get some "behind the curtain peeks."

How Square is OwlMtModels Now?


OwlMtModels' store-front on Square's site.

Lastly, the conversion to Square for our on-line sales has been fairly smooth. A few minor shipping charge issues with getting the rates to calculate correctly, but those have mostly been solved now. Thanks to everyone who ordered in October and act as testers for the new Square storefront.

Navigation Page with-in the Store Front - Choose type of product on the left by category.

I am also planning to go back through the main OwlMtModels website and rearrange everything there. Hopefully it will become easier to navigate that site, and also incorporate links to this blog, video tutorials, and the Square On-Line Storefront as well.

Happy Modeling!
Jason Hill

Routing & Grading Cards with OwlMtModels 1220 Decals

Cross-post from Jason Hill's Night Owl Modeler blog:

Over the years, I've used blank snippings of paper glued to the car sides to simulate the routing cards on my models for over 20 years.  In recent years, modern modeling takes advantage of digital depth of field stacking and focusing which makes it possible to even read the smallest lettering on models.  In recent months, I've started to notice my older models with blank routing cards are starting to draw unwanted attention.

NC&StL 15337 Accurail kitbash with OMM 1220 routing and grading cards matching photo below.

However, for the prototype modeler and the operating modeler there's one detailing aspect which I've that can be improved with modern technology.  Why not also be able to read what is on the routing and grading cards on the model?

NC&StL 15337 - Fowler -TRRA photo, East St Louis, July 1948, Illinois, Joe Collias coll, Bobs Photo - Ted Culotta collection

The prototype photo  of Dixie 15337 shows two or three cards.  The ones on the left are probably routing cards, and the one on the right is probably a grading card.  It's another level of modeling enjoyment to be able to match prototype photos even closer now.  Let's look closer at how this came to be.

OwlMtModels' Decal Cards


The OwlMtModels #1220 decal set includes 144 prototypically based cards, two groups are in white, a third group in light green/blue, and the fourth in a manila/beige color.  Thanks to Anthony Thompson for making posts on his blogs over the years documenting the vast historical cards used by various railroads.  I'm also linking directly to Tony's blogs in this post for the prototype examples.

OwlMtModels' new #1220 Routing & Grading Cards decal sheet.

Earlier this summer I asked Todd Osterburg  to see what we could do with PDC's fine line decals.  He was nice enough to draw the artwork.  The decals are produced by PDC in Canada and sold through OwlMtModels website for 3.50/sheet.

Railroad print shops would use various basic pastel colors which they had on hand.  Special colors such as yellow or red were reserved for home-routing/shop cards or bad-orders.  If there's interest, OwlMtModels may offer other versions, but this is a starting point for modelers.

Prototype Cards


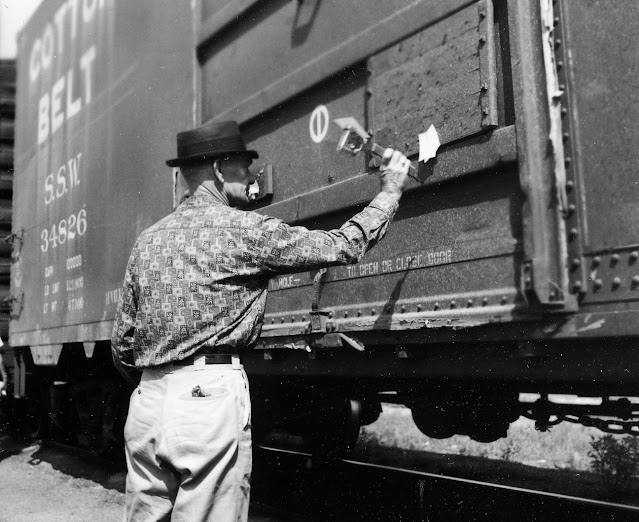
A clerk cards a SSW boxcar with his hammer-stapler - Linked photo from Anthony Thompson's Routing Cards #11 blog.

Cards would be hammer-stapled anywhere along the lower wooden parts of wooden cars.  Steel cars had 'tack boards' and 'card boards' mounted to the carsides.  Flatcars and tank cars with wooden running boards could have the cards stapled directly into the deck or running boards.

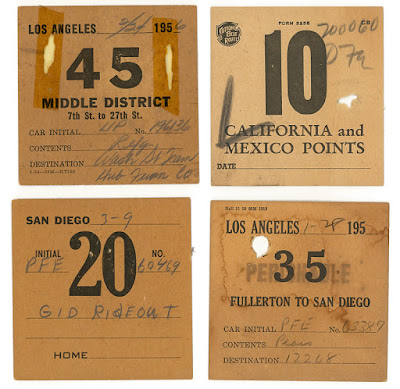
Routing Card typical from Anthony Thompson's blog

The SP used a number system to send the cars around the system.  There were also basics for WB/EB and intcherchange cars seem to have cards for which railroad the car was going to go to.  For example D&RGW or UP at Ogden.

Routing Card Number index for SP - Anthony Thompson's blog Part 10 where other examples are shown.

There were many systems of cards used around the country.  It seems that different divisions would also have their own numbering series.

Another excerpt from Anthony Thompson's Routing Cards #11 blog

Much of the smaller lettering is not possible to print even with modern technology, so the decals are limited to the larger lettering.

Grading Cards


The grading cards: A, B, C, D (or X, depending on the railroad doing the grading) were easy ways to sort out which cars would be available for loading.  The traffic departments would actually keep a large sheet of paper, similar to the operating department's Train Sheet, to keep track of all the cars on the division going to customers and expecting to be becoming available in the coming days.  They would also keep track of how many available boxcars (XM) would be available in each grading category.  Shippers would then be putting their orders in for their loads which would require at least a certain grade of car.

Grading Card examples linked over from Tony Thompson's blog.

Anthony Thompson's blog, Route cards, Part 19: grading freight cars, covers more details of car grading.  Operationally, I'll probably be doing more on car grading for my Jawbone Branch at some point, but for now back to the car carding.  Tony has some additional grading card variations in Route cards, Part 23: varieties of grading cards post, including the octagon-shaped cards.

The railroads would grade cars according to several subjective standards by the carmen looking them over between loadings.  Cars could be improved to some extent by sending the cars over to the RIP track and spending some time cleaning up the interiors by fixing exposed nail heads, damaged boards, etc.  Some cars would be carded to be "CLEAN OUT" which would involve removing old materials and debris from the car's interior.  Normally, the customer that unloaded the car was supposed to clean out the car but that didn't always happen.  The railroads often had a whole track in the typical yard for cars needing "Clean out".  Cars could easily spend 8+ hours in these tracks as you wouldn't want to be inside cars sweeping them out if more cars were being shoved into the track.

Accurail PFE R-40-27 with a routing, Time, and CLEANED card, typical for perishable assignments.

Reefers obviously would need more specialized care and cleaning, thus it was concentrated in a few repair shops.  PFE had three locations, Portabello in Idaho, Colton and Roseville in California.  SFRD concentrated their efforts at San Bernardino and Bakersfield's facilities.  These repairs and cleanings could include removing spoiled perishables, cleaning the bunker drains, repairing or replacing the linings of the car if damaged or contaminated, etc.

Tank cars often needed to be cleaned if they were being reassigned to another loading.  Some loads required regular steam cleanings, other linings required NOT to be steam cleaned.

Flatcars were pretty simple, their wooden deck edges were easy targets for the clerks' hammers.

In Closing


At a little over one cent per card, these decals are quite affordable, and one sheet can do dozens of cars.

Right (not photographed) side of Accurail kitbash, which is finished in 'typical' fashion with chalk marks and routing cards.

I've started applying the cards to cars in my fleet, so you might start noticing them in future blog posts.

Jason Hill


Related Articles:


Some specific blog posts worth a look.

Route cards, Part 11 — examples

Route cards, Part 19: grading freight cars

Route cards, Part 20: more grading cards

Route cards, Part 23: varieties of grading cards

Upgrading SPMW Pullman Bunk Cars (Part 1) - New Paint & OwlMtModels Decals

Cross-over post from NightOwlModeler blog by Jason Hill, using OMM 1224W SPMW Pullman Bunk Car decals on Rivarossi 12-1 sleepers.

It's been at least 20 years since I last worked on my Rivarossi SPMW Pullman cars, and I think it's about time to do some upgrades!  While not as perfectly accurate as the Walthers and Branchline plastic-tooled passenger cars of the early 2000s,  So, they can be had at swap meets and on-line websites second hand.

Starting Point & History


Time to upgrade my SPMW Pullman Bunk Cars!

One nice advantage of using the old Rivarossi cars is that they're not to expensive and they also have the non-air conditioned roofs!  The lack of A/C makes them perfect for modeling these bottom-grade tourist cars, several hundred of the older "Tourist" Pullmans were sold to the SP during 1948 in the lead up to the disposition of the 9000 Pullman cars to the railroads at the end of the year.  This makes since as the court's anti-trust order came in 1945, the railroads and Pullman had been negotiating exactly which cars would be sold off, scrapped, or would be bought for continued service after the Pullman company owned pool was broken up in December 1948.

Several other large batches of Pullman cars which the SP bought in 1948 were retired by the SP in 1953 as they wore out and weren't needed with the LW cars the SP bought in 1949 and 1950 for the Cascade and Sunset Limited.  Then another large group of HW Pullmans were retired from revenue service in 1955-56 after the discontinuance of all the SP's 3rd rank passenger trains at the end of 1954.  Most of SP's premier HW Pullmans didn't last past 1956 in regular service.  The remaining SP HW Pullmans were held, leased, in the new railroad owned Pullman Pool until the 1962-1966 time frame when the US Government finally cut off the requirement to keep a national pool of passenger cars for national emergency military movements.
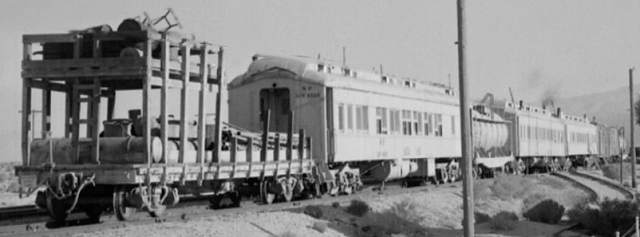
SPMW System Outfit Consist, circa 1960 Lone Pine  - owensvalleyhistory,com - ebay47_lone pine_sml

While I'm keeping my modeling in the pre-1958 era, this consist certainly could have existed in Freight Car Red scheme before 1958.  So I'm going to do some upgrades to my old Rivarossi Pullman SPMW cars.

My original starting point for these three models were my 25-year-old models using MicroScale decals and minimal research materials, resulting in cars that were only retired in 1954-56.

One of my original SPMW Pullmans from the early 2000s. - Jan 2020 at LMRC, Jason Hill photo.
 
In the last 15 years SPH&TS has printed their series of Passenger Car book, including one dedicated to the SP's Pullman cars, which covers much of the prototype information.  Plus Pulllman Panorama has more information on Pullman series, arrangements, plan numbers, basic dispositions, etc.  And now in 2023, Ken Harrison has released his wonderful SPMW book with many photos.

Unfortunately, my cutoff has been circa 1953 for my fleet since I settled on steam-diesel transition era modeling and even with the Jawbone Branch's cutoff date now being pushed back towards 1954/55, these cars are really pushing the limits of my 'comfort' bracket for modeling.  Also one of the numbers I chose 25+ years ago should have been a 16-Section Tourist Sleeper, so basically totally the wrong basic model.

Repainting


These issues have finally pushed me to redo my SPMW Pullman cars.  

SPMW 4807 before decalling, left side.

The cars that became the 4807 was repainted using a custom mix of StarBrand paint from P-B-L of SP Freight Car Red and I was out of the Light Freight Car Red, so I mixed in some Depot Buff to make the paint look like it's been sun-faded a bit.

SPMW 4807 before decalling, right side.

The car was easy to repaint.  I removed the interiors and roof/window section.  A piece of scrap sheet styrene was used inside the windows to keep paint from wondering around the already painted interior of the cars.

SPMW 4812 before decalling, left side.

The 4812 used a nearly straight mix of StarBrand SP FCR, which is actually quite a bit more saturated.  So I'll just say that this car's been more recently repainted to full FCR colors.

SPMW 4812 before decalling, right side.

The I had already painted the roofs aluminum/silver a number of years ago, so no need to do that again.  I did swap a couple of the roofs around again, to make the two FCR cars come out with aluminum roofs and the car below got the only non-aluminum roof.

They're Green?!


The third car received some special treatment, when I went back through Ken Harrison's SPMW book again, I found several photos of freshly retired Pullman Tourist Car.  These cars didn't receive FCR paint immediately, but instead continued in Pullman Green with patching for SPMW within a couple of months of being sold to the SP in 1948.

Left side SPMW 4866 before decalling.

Because I do generally consider 1946/1948 as the early edge of my modeling, I decided to repaint one of my Pullmans from FCR into this 'original' scheme when these cars came to the SP.  Specifically, I chose the 4866, which was converted in Feb'48 and was still in patched green scheme later that year when photographed.  Ken has a photo of this car in the book, which mostly matches up with the old Rivarossi models I'm using.  The car has single aisle windows, but one minor change is it has four full size windows on the A-end lounge room.  I don't really feel like rebuilding the windows, as I'd have to change the prism glass in the roof.

Right side SPMW 4866 before decalling.

It is hard to tell in the prototype photo if the letterboard was patched with SP Dark Olive Green or maybe black.  I pre-painted the black patch on the side and also the letterboard between the panel joints.  Then masked the lower center panel per the photograph for the reporting marks.  The old Pullman Green was custom mixed from StarBrand SP DOG, with a bit of black to get towards my 'standard' Pullman shade (less "warm" red-brown) and then Depot Buff was added to bleach and pre-weather the green color.  As this green coat is actually going directly over weathered FCR, it creates an interesting reverse-modeled appearance.  The letterboard was then lightly oversprayed with the 'Pullman Green' custom mix, which let much of the pre-shading black come through.  This effect is commonly used by aircraft and armor modelers to create special effects around panels and panel lines.  In this case to creating a color difference around the center letterboard panel, which would have been patched out.

Decalling!


So now the question is who's decals to use?  I've seen MicroScale's offerings, but they really don't give good return for the space of decal paper used.  Too much space is spent on very rare and specialized MW equipment that I don't even plan to own anytime soon, but not enough of the common car types.  I found an answer when Todd Allen Osterburg told me that he was developing several new SPMW decal set, which are now being offered by OwlMtModels and printed by Bill at PDC in Canada.  

SPMW Pullman Conversions - OMM #1224W

The OwlMtModels 1224W & WS set is available at OwlMtModels' new store-front.  The set is designed to decal up to three cars from the common number series of SPMW's Pullman bunk cars.  Included are "Occupied Outfit Cars" signs which can be fabricated to hang on the end-grabirons and on the switch stands of the track the cars are left on, effectively 'blue-flagging' the cars so they aren't coupled to.  Often these standing outfits when set up for 'camp' mode would not be moveible without some amount of work to stow and clear away the various stairs, ladders, water, electrical, etc connections to the ground. 

Examples of OMM's stencil reporting marks, and warning signage from OMM #1225WS set on B-50-2 Ready Boxcar.

OwlMtModels is also offering decal set #1225 SPMW Boxcars, which covers many assignments for B-50-8/10/11/12/13/14/15/16 classes. and #1218 for SPMW Supply Boxcars.

SPMW 4807


SPMW 4807 Decalled Left Side

The 4807 was lettered with 'typical' arrangement for reporting mark placement, and I chose to add the Danger/Peligro warnings, which tended to move almost anywhere along the lower car side.  The left side still needs a "LT WT" stencil applied to the left of the weight 152000 stencil. - Just noticed that I missed that when I took these photos.

SPMW 4807 Decalled Right Side

The SPMW 4807 still has some kludged roof vents, which I'll probably be removing.  The 4807 actually did have a T-smokejack which was closer to the center of the car, in the corner of the main 12-section part of the car.

Vents clipped off, sanded, and 'patched' with light gray GellyRoll gel-pen.

I went ahead and removed the extra centerline roof vents.  I used a sanding pad to roughly clean off the scars in the roof, but that of course exposed black colored original roof. 

I'll be doing some tricks to hide that.  I decided to try using the same Gel-Pens that I used for chalk marks to roughly get the same color on the roof, then I'll do some more roof weathering blending.  Might be interesting to draw in more of the roof panel lines on the un-detailed roofs.

SPMW 4812


SPMW 4812 Decalled Left Side

The SPMW 4812 is more 'typical' of the most retired Pullmans in Ken's book before the late 1958s when propane tanks for cooking and heating were cut into the side of the car.  Cars with these modifications are certainly interest, requiring ladder/stairs and doors, etc.  Many of the cars in the book also show swamp coolers and even fuel-oil tanks installed in vestibules with the doors sometimes removed.

SPMW 4812 Decalled Right Side

But these cars are pretty much done now.  I'll probably do a bit of weathering to slightly knock down the brightness of the white decals.

SPMW 4866 - "The Green One"


Left side of finished SPMW 4866 with patched reporting marks.

One interesting small detail is that the prototype 4866 had a non-standard stenciling applied to the car in the prototype photograph.  It had periods on the "M.W." which all other cars I've seen photos of didn't have.  I used the 0.5mm White Gel-Pen that I covered using for Chalk Marks last month's blog.

Right side of finished SPMW 4866 with patched reporting marks.

The under body of 4866 is still showing mostly FCR color for now.  I'll probably weather it darker as it would have had coming from old Pullman scheme.

Other Modifications


I am planning to make a couple more changes to these cars, as Ken's book has shown more of what these non-air conditioned Pullman Tourist cars looked like in SPMW service.  One of the big features about these 1948 conversions is that they do not have roof ducts.  Therefore they also shouldn't have the A/C equipment under the floor.

The Rivarossi models come with three battery boxes on one side, and another on the other side.  The prototype photo of 4866 shows the car does have the large water tank and the short-fat air tank, but nothing else hanging under that side of the car.  I'll probably cover cutting these boxes off in Part 2, which shouldn't be too hard with a razor-saw.

I will also say that these cars had some modifications from 25 years ago, including cutting down the fixed 'diaphragms' and not fitting any new diaphragm (which is correct for most MW cars), body mounting KD couplers on closer couplings, and rebuilding the bolsters to lower the car to more correct heights.

Thoughts of Post-1958 Outfit


SPMW System Outfit Consist, circa 1960 Lone Pine  - owensvalleyhistory,com - ebay47_lone pine_sml

Maybe I'll find another body, and do a post-1958 gray with black lettering version, just to do it for OwlMt to show what they'd look like.  I have this great photo of a gray SPMW Outfit at Lone Pine, which probably was stationed there as they scrapped the track back from the end of the branch at Owenyo in 1960, from the owens valley history website.  This consist has three of these older ex-Pullman 12-1 bunk cars without A/C.

In Closing


I'm going to wrap up this post at this point.  Just to point out, I only used the one set of OMM 1224W for these three cars.  Some creative cutting was used to get '80' and '81' and '72' to get the digits for the '07' and '12' number jumble to work out nicely.  '44's were cut up to provide the leading '4's for the '48' series cars.  Extra hundred series numbers pairs of '44' and '55' are provided for the 4400 and 5500-series cars.  We'll probably change future prints to have an extra 48 or two to help if you focus on these cars.

Completed SPMW 4866 with end-reporting marks too.

I'll probably come back and do a Part 2 with any last touch-ups I do on these cars.  Perhaps, I'll do it on the gray scheme...  At some point in the future, if I want to add lighting to these 'camp cars' so that I could do cool night-scenes on the Jawbone Branch, I may refit these cars with Walthers metal trucks as on SP 5199 (Part 1 & Part 7).

Jason Hill

Related Articles:


Chalk Marks - A newer blog on using GellyRoll pens for chalk marks by clerks and carmen on freight cars.

SP 5199 (Part 1 - My build-blog on a 69-BP-30-1 from Southern Car & Foundry.

Freight Car Overview Index - A list of my modeling blogs on various SP & Multiple RR's cars, including many SPMW cars.

Owens Valley History - Website with hundreds of photos of Owens Valley and the Jawbone Branch, which I'm modeling.

2023 October News Update - New Lumber Loads & Decals

New On-Line Merchant for OwlMtn


We've finally had enough of PayPal breaking our on-line store in 2023.  OwlMtModels has therefore shifted over to using Square's Store-Front for our on-line sales.  OWLMTMODELS ON-LINE STORE where you can order any of our products.  Many of which now are accessed via option selections, specifically for decals, the new 3002/3003 "Short-Wide", & 3004/3005 "Narrow" Lumber loads.

Now Available!


Here's the announcement for the new kits!

Speaking of Lumber Loads, let's get some more information on the new 3002/3003 "Short-Wide" Lumber Load kits.

3002 - "Short-Wide" Lumber Load Kit, 2-Stack - $29.95/car


The 3002/3003 "Short-Wide" Lumber Load kits are now ready for early-orders.  We are just finishing up the instructions and packaging now, in anticipation of the October shipping date.  However, if you're one that wants to get the order in now, feel free to head over to the Lumber page on OwlMtModels website and put the order in now.

Don't worry, we'll be putting out more information in the form of blog posts articles, and if there's interest, an updated video which will cover updated techniques and 'how-to's for actually doing the 'iron-wire' or 'high-tension steel banding' instead of the upper wood bracing.  

New Decals Available


We've been working quietly on some new decals.  Enjoy the fun new products for your freight car fleet!

1220 - Routing & Grading Cards - $2.00


Expand the 'human touch' on your freight car models with these Routing & Grading Cards.

Based on typical routing cards and grading cards, you can now add this extra level of detail to your favorite freight cars.  Some head-end passenger cars and express refrigerators also were carded as well.  There's enough cards on this sheet to easy card over a dozen cars, making this a great deal to fill out your order from OwlMtModels with.

Example on Accurail NC&StL 15337 Kitbash


Routing & Grading Cards added to "match" prototype photo.

Our new Routing and Grading Card decal set has 36 different prototype-based cards styles with two sets in white backgrounds, one in beige, and one in light blue.  This means you get 144 cards to put on your cars to give that extra human clerk and carmen interaction look.  Some of the cards have different numbers, etc on them, so there aren't lots of exact duplicates, except for specific prototype cards.

NC&StL 15337 - Fowler -TRRA photo, East St Louis, July 1948, Illinois, Joe Collias coll, - Ted Culotta collection - used with permission.

NC&StL 15337 has at least two cards on the left side in this prototype photo.  I believe the card on the right over the "XM27" is the grading card, and the two over the "LD LMT" on the left end of the car are in the regular place to put the routing cards, which can result in several still in place.

1221 - Owl Mountain Lumber Co. & Do Not Hump Placards - $3.00


Stencils for Owl Mtn Lumber Company with their happy owl "Nighty" mascot.  Do Not Hump placards will ensure his lumber for all the new post-war boom housing will make it safety to the customers.

Ever wanted to put some extra detail on your OwlMtModels Lumber Load?  How about spread some advertising for the brand to your HO-Scale citizens with some stencils with logo and name?  Or maybe you can make some nice signs for your local lumber yard on your layout.

Owl Mtn Lumber Company's advertising!

Looks like there's a new lumber company in town and they decided to "advertise" <grin>.   Sounds like they're hiring.  So you can become the foreman and have fun placing 'advertising' on the outbound lumber loads.  Four 'standard' stencils are now available in OMM 1221 Decal Set.

Owl Mountain's owl head on your lumber load or lumber yard

Extra large 'head herald' which can fit well between stakes on lumber loads.

Large stencils for the "Owl Mountain Lumber Co."

These larger stencils are good for quickly advertising the company on lumber loads.  If you these stencils on gondola loads, remember to do it safely and not fall off!

Also don't forget to put the "DO NOT HUMP" placards on the car.

The railroads keep mishandling our lumber loads.  Corporate wants to be sure we're placarding all our outbound lumber loads to keep our lumber from getting broken by the careless railroads.  Remember, making them flat-switch our loads will also make them take longer to keep them moving so our sales people can broker the loads en route!

Ahhh, looks like someone stenciled this pile before it was secured, resulting in a shifted stencil.

Even with the loads stenciled for "DO NOT HUMP", remember the railroads can still bang the cars around enough to shift the loads.

1222 - Repack Patches - $3.00


Make your restenciling and tare data changes easier with these various color patches.

A great pairing with our Era A, B, C, & D sets makes customizing the tare stations and weights to match the prototype photos a snap.  Three different Freight Car Red colors to choose from, plus classic black to 'patch out' the old weight data and station before applying the new stenciling.  Sized to fit your standard freight car weight data, tare station and date space, as well as the repack data, usually over the right hand truck.

1223 - SP San Joaquin Division "When Empty Agent" - $2.00/version


Variety of SP "When Empty Return Agent" special assignment stencils.

The first of our 'division specific' decal sets, this one will be made available in honor of the SPH&TS convention in Bakersfield, CA this year.  These stencils would be applied to cars which needed to be returned to cover specific loading assignments. 

Red Caboose boxcar with "When Empty Return to SP Agent Bakersfield, Calif."

The local Agent would have direct control over these cars when they came 'home' to him.  For example the Monolith Agent was responsible for taking care of the large cement plant.  So covered hoppers or boxcars would be marked for the Monolith Agent.  Mojave, Bakersfield and Fresno would also have various types of cars assigned to them, guaranteeing that they would have suitable cars to protect the customer's shipments.

Contact us if you'd like custom decals made up for your division or fictitious road in this format.

1224W & 1224WS - SPMW Pullman Conversion (White, pre-1958) - $8.00/set


Designed for decalling up to three Pullman cars which are retired into MW service.

This decal set will cover all the bits that multiple cars in the MW number series that the ex-Pullmans were assigned to.  Including "Danger/Peligro" warnings and "Occupied Ouftit Cars" which were hung on the ends of the live outfits and also at the switch stands.  LT WTs and end numbers are also provided for.

SPMW ex-Pullman Sleeper converted to Bunk Car, pre-1958.

These decals are best used on the ex-Pullman sleepers, mostly retired in groups and sold to the railroads in 1944, 1948, 1954 and 1956.  In 1958 the SP switched to the light-gray scheme with black reporting marks as the standard.  We will be offering that version in the next order in later October.

SPMW 4866 - 1948 Pullman Green Patched

SPMW 4866 wearing the original 1948 "Old Pullman Green" scheme with black patched reporting marks.

One of the cars that Jason did as a pilot model is a 1948 "freshly transferred" scheme which was the old Pullman Green color, patched with black to provide the reporting marks.  The letterboard of these cars was also quickly blanked out with either black or SP Dark Olive Green.

SPMW 4812 - Standard Pre-1958 SP FCR with White Lettering

SPMW 4812 in a new coat of FCR.

Part of the 1948 group of Pullmans converted SPMW 4812 shows the basics of the new 1224W decal set.

SPMW 4807 - Standard Pre-1958 SP FCR with White Lettering

SPMW 4807 with a 'sunburnt' FCR coat.

Another of the 1948 cars, a little later in life with the FCR starting to fade a bit.  This is ideal if darker weathering washes are going to be applied, which will keep the car from getting too dark during the process.

1225W & 1225WS - SPMW Boxcar Conversion (White, pre-1958) - $8.00/set


SPMW Boxcar - Various Assignments

Retired SP boxcars were restenciled for various assigned services, but often did not carry stencils for their new rolls.  The departments that did stencil their 'ownership' of the car included the "Stores Dept", which included a sub-set of cars marked "Supply Car", which we're covering with the OMM 1218/1219 set specifically.

SPMW 2257 using the 1225 set for the warnings, reporting marks, and LT WT data set.  A couple tid-bits like the "READY" is from OMM 1214 and the SP Herald from stock kit or OMM 1218 set.

While most of the cars didn't have Tool, Bunk, etc stenciled on their sides, you can always stick it under the car somewhere to remind yourself what service the car is in!  Handy when you're putting together your system gang outfit and keeping it straight from the division's tool cars and misc MW cars.

What's Next?


We look forward to seeing everyone at the Bridgetown RPM meet in Portland, Oregon on October 7, 2023.  And then three weeks later at the SPH&TS Convention in Bakersfield, California on the 26-28th!

Jason Hill

2024 May News Update - 4012 Investment Parts for Casting

This is a short update of what's been going on.  The sample invests are over at the foundry, I've not heard back if they came out ye...